

The cost to build a root cellar depends on size, location, materials, and other variables. Our guide will help you decide which option is best for you.
Keep your family safe when a big storm hits


If you live in a storm-prone region, you know that when it comes to safeguarding your family from severe weather, a sturdy storm shelter is essential. A cinder block storm shelter is a reliable option that you may be able to build in your backyard. In this guide, we'll walk you through the process of constructing a storm shelter using cinder blocks. By the end, you'll have a secure place to seek refuge during storms and adverse weather conditions.
Before you continue, know that this is a time-intensive and labor-heavy project. It is not easy or simple. Typically, we recommend hiring a local storm shelter company to build shelters of this magnitude, as this project takes a lot of effort to complete. Unless you have extensive construction experience and more than a few strong and sturdy helpers, do not try this DIY on your own.
When the pros build storm shelters, they know that it's crucial to prepare and plan before rolling up their sleeves and getting into the construction process. They always take a few essential steps to get everything in order before building to ensure the storm shelter project starts off on the right foot.
Before they even break ground, a storm shelter company will take the time to create a detailed plan for your storm shelter. They’ll determine the shelter's size, entry point, and location. Talk with them as you think about an area with proper drainage, away from potential hazards like flood-prone zones or areas with unstable soil. Moreover, consider the accessibility and proximity to your main residence for convenience. Sound complicated? That’s because it is. Seriously, you should probably let a pro handle this one.
You’ll need to research the local building codes and regulations regarding storm shelters in your city. Some areas require permits for such structures, so ensure you have all the necessary documentation to proceed legally. Another good thing about hiring a pro for this project is that they’ll be able to get all the permits for you.
Put on all your safety equipment, being sure not to forget a hard hat. With an excavator, dig a hole in the ground according to the dimensions of your shelter's floor plan. Ensure the hole is deep enough to accommodate the entire structure comfortably. This means you should dig about 3 feet wider and longer than the ideal final size of your shelter. This extra space will give you some breathing room for maneuvering during construction and will also provide a stable foundation.
Also, dig down at least 2 feet deeper than the shelter's final height. This extra depth allows you to create a sturdy roof covering. You'll be topping it off with a layer of concrete and then covering it with a layer of soil. That way, your shelter will be well-protected and ready to take on whatever comes its way.
Keep in mind that working with excavators can be very dangerous for people without the proper training and know-how. This is another reason why this is a project best left to the professionals.
Create a solid foundation by first laying concrete footings. The footings will bear the weight of the cinder block walls and prevent settling or shifting over time. Use steel reinforcements in the footings to enhance their load-bearing capacity.
Then, you can set up support posts around the perimeter of the foundation frame. These posts will provide additional reinforcement to the structure. You’ll also need to place steel reinforcements—or rebar—inside the foundation frame to add strength to the shelter's base.
Finally, pour a cement mixture into the foundation frame, covering the steel reinforcements completely. Allow the cement to dry and set properly before moving on in the process.
Designate an area for the shelter's entrance and construct a sturdy door frame. The door frame will be crucial for easy access and secure closure. Additionally, install a cellar door that is robust and will seal tightly to prevent water infiltration and maintain security.
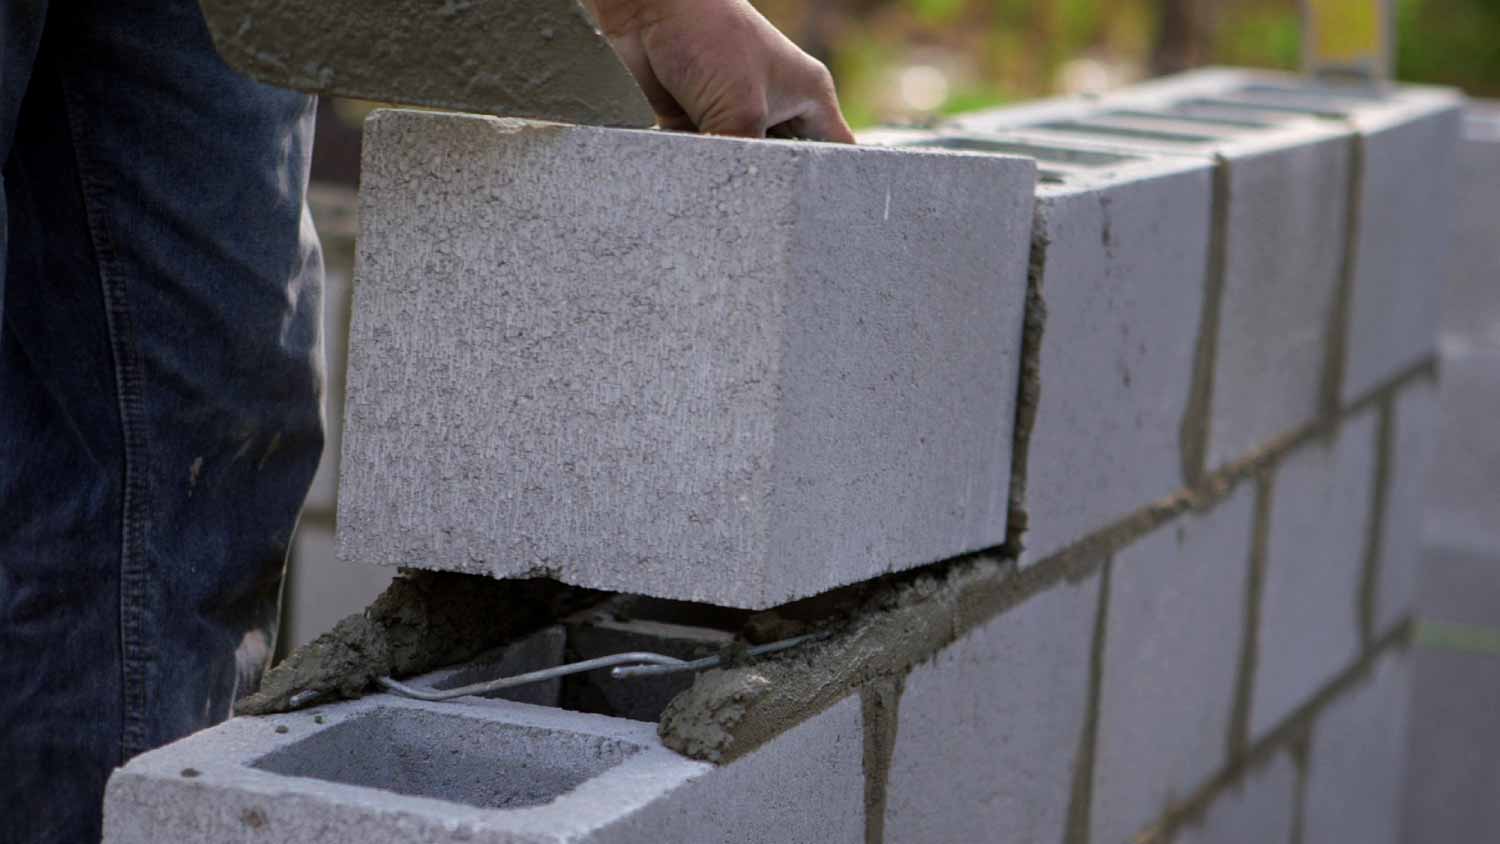
Start building the shelter’s walls using cinder blocks. Apply mortar between the blocks, ensuring a tight and secure fit. Make sure to leave openings for doors and ventilation as necessary, and consider adding rebar or reinforcing mesh within the block cavities to enhance structural integrity.
Proper ventilation is crucial to ensure a constant supply of fresh air in your shelter and prevent the buildup of harmful gasses. Install vents with protective screens to keep debris and pests out, or go with a ventilation system made up of PVC piping in the shelter’s corners. Either method will ensure proper airflow inside the shelter.
When it comes to constructing a storm shelter, the roof is a crucial component that plays a vital role in providing protection from the elements. Whether it's a tornado, hurricane, or any other severe weather event, a well-built roof is your shield against the forces of nature.
Opt for materials with good wind mitigation that can withstand impact and flying debris. Metal roofing, reinforced concrete, or thick reinforced fiberglass panels are excellent choices. These materials offer excellent resistance against extreme weather conditions, giving you the peace of mind you need during a storm.
Support beams play a crucial role in bearing the weight of the roof and providing a strong foundation to withstand the forces of nature. Choose high-quality materials for your beams, like steel or reinforced concrete, as they boast remarkable strength and resilience.
Before installing your beams, take accurate measurements to determine the appropriate length and size of the support beams. Precision is key to ensuring a perfect fit and reliable support.
Position the support beams strategically to ensure they are resting on a solid foundation. If necessary, use a shovel to dig shallow holes to secure the base of the beams firmly. A stable foundation is vital for long-term durability.
Proper alignment of the support beams is also essential for even weight distribution. Use a level and measuring tools to guarantee the beams are straight and balanced. Once the support beams are in position, secure them tightly and firmly in place. Utilize sturdy fasteners like nuts and bolts to ensure they don't shift or move during extreme weather.
To protect your shelter from water damage, you’ll need to apply a waterproofing membrane on the exterior walls and roof. You should also insulate the interior of your shelter to maintain a comfortable temperature and reduce energy consumption while the shelter is in use.
Building a cinder block storm shelter is a complex task that requires specific skills and tools. While a DIY approach can be rewarding for a select (highly experienced) group of people, it's important to acknowledge your limitations and the potential risks involved in this type of project.
This is rarely, if ever, a DIY project. It's better to hire a local storm shelter builder to ensure a safe and reliable space for you and your family.
Coby has excellent knowledge of home electrical service.
The service was excellent, it was very good. They were very responsive , arrived on time, they respected our home, and worked very polite and professional. The pricing was fair and competitive.
 Treasure Valley Solutions
Rob was quick to reply to my Angie's List message with a phone call to discuss what I needed. When he came to my home, he provided a lot of information about my fix/replace options even though he does not replace my style of gutter. He also wrote down the three local gutter contractors who...
 AAA RAIN GUTTERS
I had bought house which had been flagged for potential support issues. At first a structural engineer had said it was sound, but after noticing that the floor of one of the rooms was extremely bouncy and a loose support beam, I started looking for a place that did foundation work. It was...
 Foundation Supportworks of Idaho
Ms. McClendon is knowledgeable, professional and pleasant. She arrived on time. After I had briefly explained what our tentative remodel plans are, she then proceeded to look the house over, slowly and carefully, both inside and outside, noting (for example) where the 1959 Yellowstone...
Paul Mason is one of the fairest, most straight shooters that you will find in the building trades. He understands the process and materials of refinishing and does not try to over-complicate the job nor oversell or expand the job. He was far more reasonable than the local...
The clean was very expensive and very cursory, in fact our one-person team that does routine cleaning at our prior home did a much more thorough job at her routing cleaning than they did on their make ready clean. Cabinets were not wiped down, baseboards, it appeared as if they swooped...
 Boise CleanPro
The toilet is European design and state-of-the-art, it is very hard and nobody knows how to do it. They did stuff that was just incredible, and they did a fabulous job. They were outstanding. They were very congenial, helpful and knowledgeable. What stand out are how superior their work is...
He was not the lowest bid, but we hired him because he sold us on his quality and knowledge. Terrible decision. He located 9 valve boxes within 2 feet of our basement windows. I questioned it, but he gave me some answer that made sense. While on vacation one of the valves popped off and...
I am always pleased with the results of working with Gabrielle--she really takes the time to ask questions and understand what you want and don't want, before she starts doing anything, which is great. She also gives you her expert advice when you're trying to make up your mind about...
From average costs to expert advice, get all the answers you need to get your job done.
The cost to build a root cellar depends on size, location, materials, and other variables. Our guide will help you decide which option is best for you.

If home is where the barn is, a barndominium may be the dream house you’ve been looking for. Here are all the details you need to know about barndominium costs.

Having a dedicated space to retire after a day in the pool may seem like a pipe dream. Learn about pool house costs to see if you can make that dream a reality.

Looking to compare a mobile home vs. a tiny home? Here, we share the significant differences, including the best lifestyles for each home type.

Learn the essential foundation requirements for adding a second-story addition to your home, how much it costs, and other considerations.

Discover the cost to build a modern-style home, including average prices, key factors, and tips to help you plan your project with confidence.