How to Install Gutters in 10 Steps: Gutter Installation Guide
Level up your DIY skills with this important home project


- Cordless power drill
- Ladder
- Crimper
- Work gloves
- Chalk line
- 1/8-inch medium-length rivets
- Downspouts and elbows
- Gutter material (appropriate length)
- New flashing
- Gutter sealant
Gutters are unassuming, but they work hard to stop rain and snow from running off your roof and pounding the ground around your home. Gutters prevent serious soil erosion, damage to your foundation, and muddy messes on your siding. If they are old and leaky, one remedy is a DIY gutter replacement. Prepare carefully and follow these eight steps to do the job right.
Prepping to Install Rain Gutters

Your gutter installation project should be mapped out on paper and clearly outlined step by step before you head to the hardware store or order parts online. This includes a plan to remove your old gutters, if needed, and how much material you’ll need to purchase for your new gutter system.
To ensure that your gutters drain properly, they’ll need to slope toward the downspouts. Plan for at least a quarter inch of slope for every 10 feet of gutter run. For gutter runs of 40 feet or more, pitch the gutters from the middle to a downspout at either end. Doing so prevents leaves and debris from completely disrupting your system. Remember to account for this when buying materials.
Finally, you’ll want to plan your project for a dry-weather day during which you’ll have a partner to spot you while you’re up on a ladder. Proper preparation will help prevent errors, accidents, and unnecessary expenses.
How to Install Gutters

Create a Plan
Sketching out a plan for your gutter installation can be useful. First and foremost, determine what type of gutter is right for your home (think about the amount of rainfall in your area, your home’s curb appeal, and the style of your home, among other factors) when choosing between gutter styles and gutter materials. You’ll also need to calculate the right gutter size for your home.
Consider drawing the basic shape of your home with a pencil and then noting the length of the gutter runs as well as where you have inside and outside corners and end caps. Gutters must be attached to the fascia and run the entire length of the roof up to a downspout. If the gutter run needs to be longer than 40 feet, you should plan to position it to pitch down from the center with downspouts on either end; any shorter gutter runs can slope down to the left or right towards a single gutter.
Measure the height of the downspouts, and add four feet to that measurement to account for the length they extend beyond the house at the bottom.
Note that each downspout requires three elbows. The elbows allow the downspout to turn to the front or to the side, so determine which you need and where. Make sure all your downspouts are located where water can safely and easily be transported away from your home—spots without obstructions such as electric meters.
Before you begin working, you should also take necessary safety precautions to prevent injury. First, make sure your ladder is placed on stable, flat ground, and have a friend around to help—they should keep the ladder steady as you work. Always work from the ladder, not the roof, and wear protective gear such as heavy shoes with traction, eye protection, and leather gloves.
Inspect the Fascia
Confirm that your fascia is free from any rot or decay before installing the gutters. To do so, poke at the fascia boards at their ends or where two boards meet; if the boards feel soft or spongy or appear visibly damaged, you should replace the fascia before installing the gutters.
The rotting could be caused by your old gutters, in which case new wood fascia is a fine replacement. If, though, the rot is the result of other factors, you can install aluminum or vinyl fascia to better weather any heavy moisture. Regardless, you might wish to contact a local roofing contractor to get to the root of the issue and ensure you’re making the best material choice for your home.
Mark the Gutter Layout and Slope
Start by marking the layout of your new gutter system on your home's fascia. Lightly tap in a nail at the highest point of the slope for each gutter run, one and 1/4-quarter inches below the metal drip-edge flashing.
Depending on where you plan to put your downspouts, you’ll also mark the low end of the gutter run. Keep in mind that the slope of your gutter should be at least a 1/4-inch vertical drop for every 10 feet of gutter. You can measure the slope by fastening a string to one side and measuring the string level across the area. Snap a chalk line between the two points.
Attach the Fascia Brackets
Examine the fascia to find your home’s rafter tails, which are usually marked by nail heads spaced 16 inches apart. Mark your chalk line on every other rafter tail and use your drill to bore a pilot hole 1/8-inch in diameter through the fascia on each mark.
Fasten your fascia brackets using 1/4-inch stainless steel lag screws that are at least two inches in length. Rubbing soap on these screws can make it easier to drive them through the fascia and into the rafter tails.
Cut the Gutter to Length
Use your hacksaw and tin snips to cut each run of gutter to length. (Here’s how to cut gutters if you’re new to the task.) If your gutter is going to continue around the corner, you’ll need to cut the end to the appropriate angle. For a square corner, you’ll make a 45-degree cut. Stay safe and work smart by assembling everything you need joined together on the ground.
If one run requires two sections of gutter to achieve the correct slope, overlap them by eight inches. Use your pop rivet gun to join them with two rows of four pop rivets each. To help prevent leakage, be sure to place these rivets on the sides of the gutter rather than the bottom.
Attach the Gutter End Caps
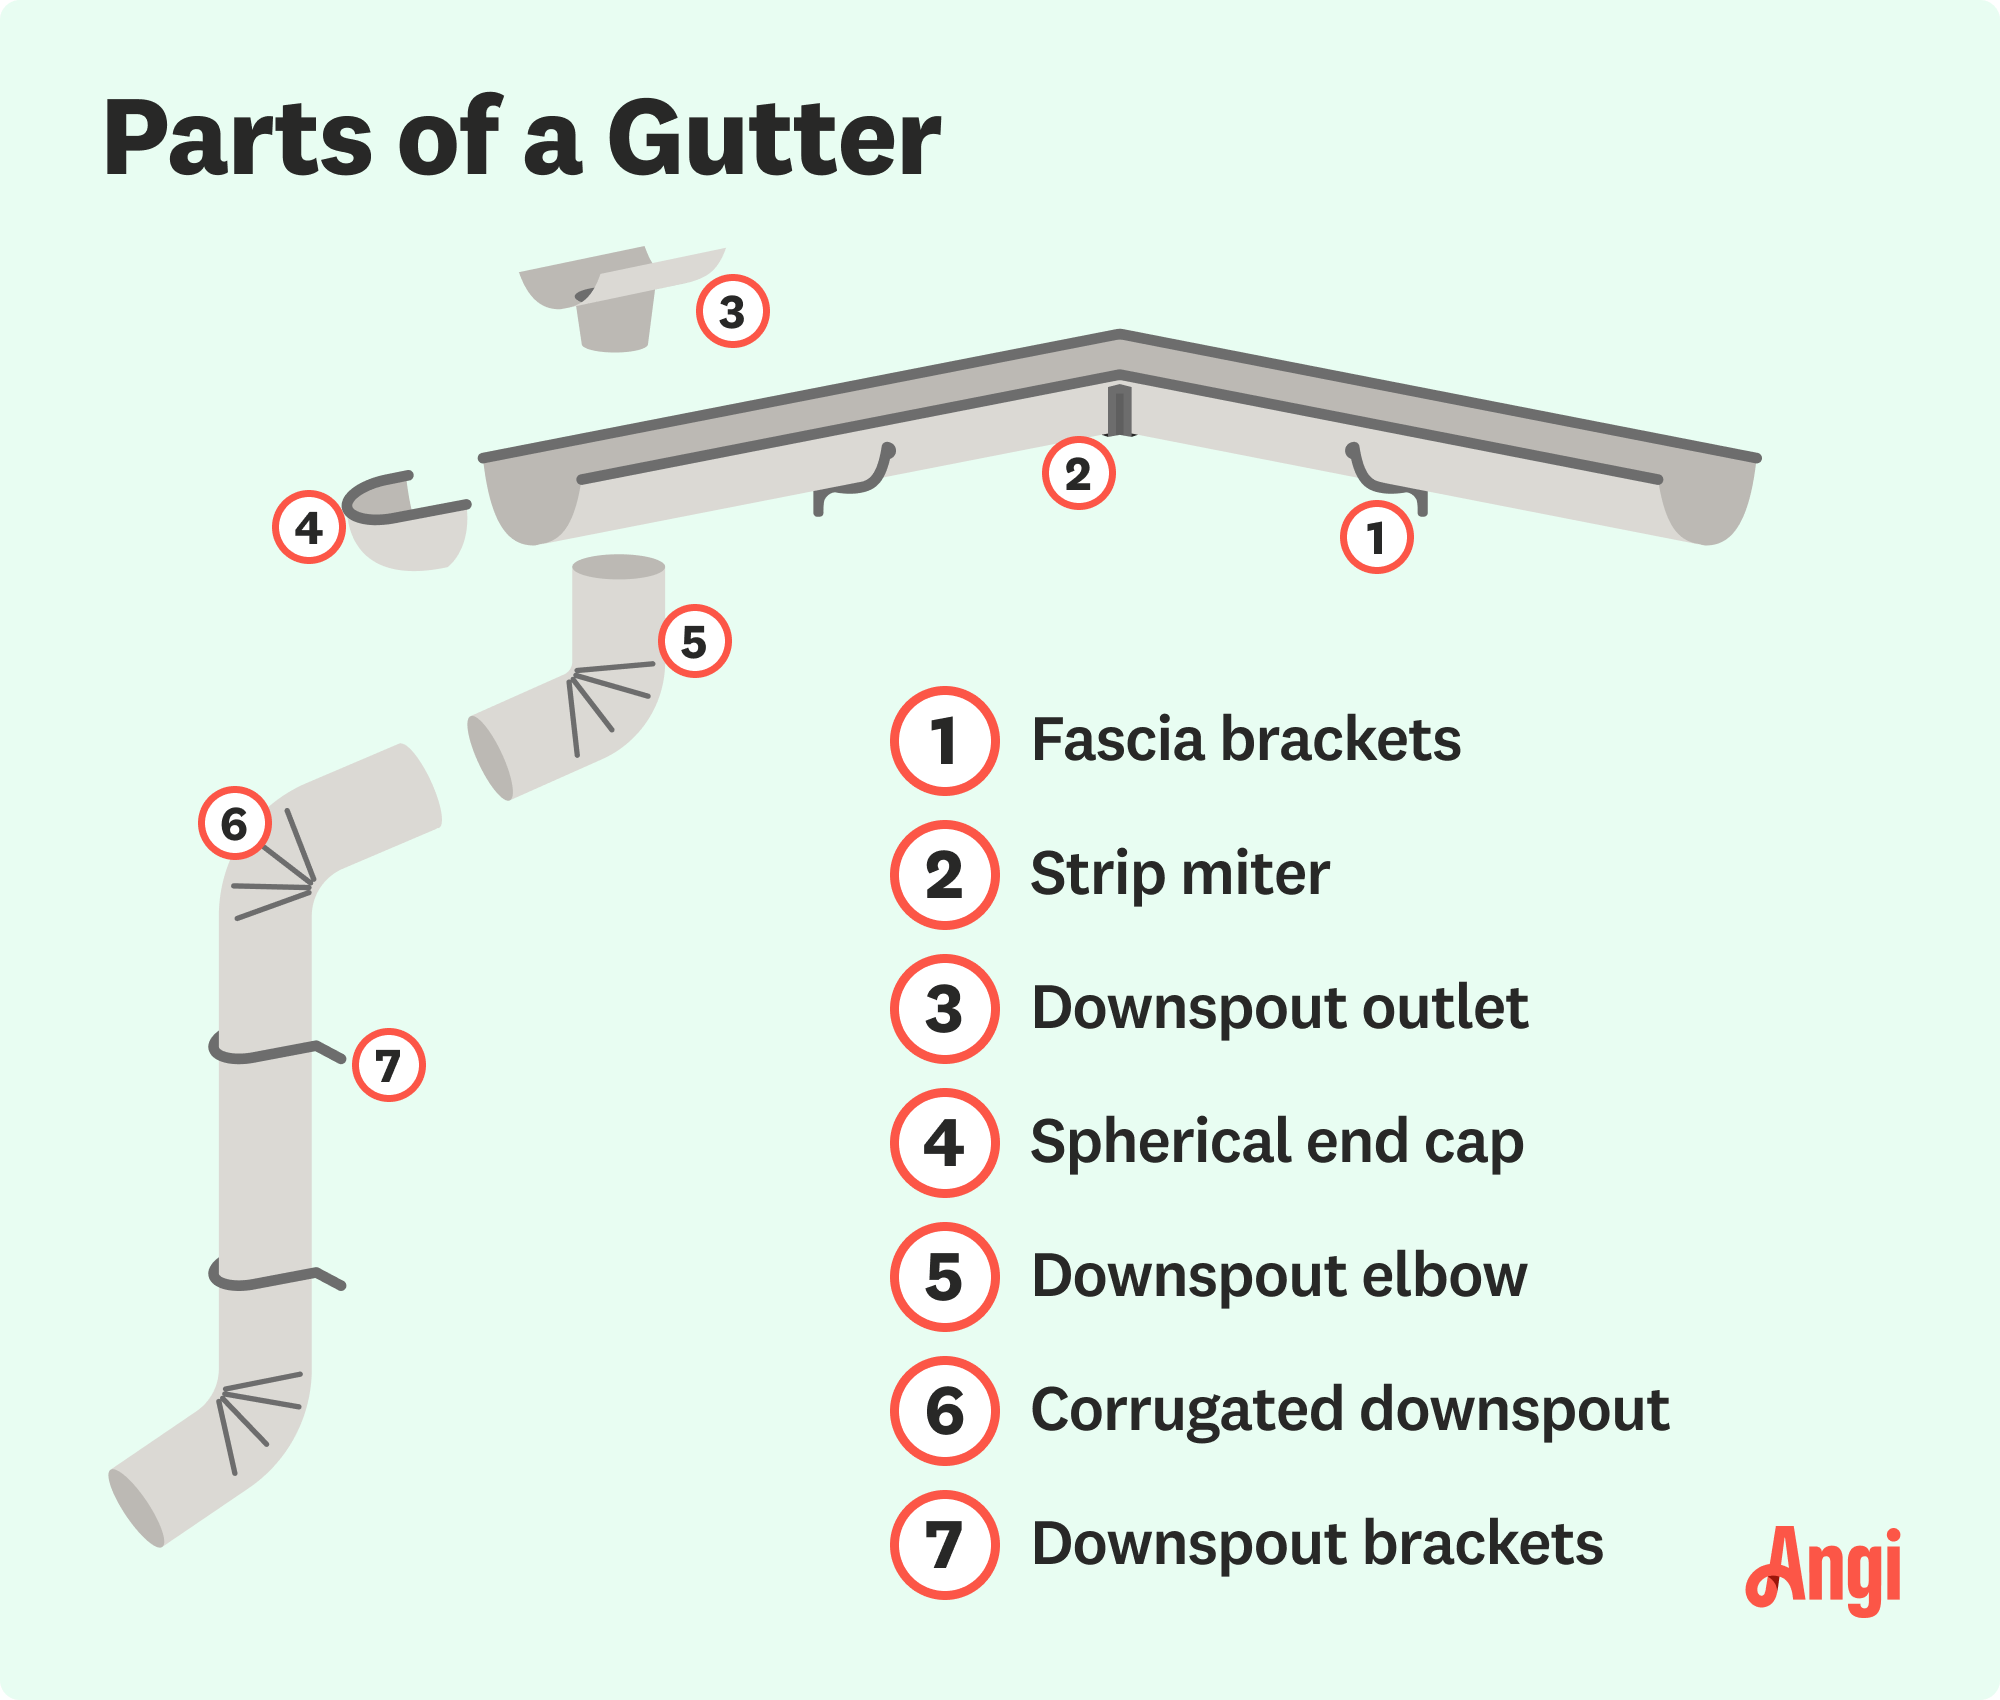
While the gutter is still on the ground, use your rivet gun to attach a spherical end cap to each end. To do this, drill a 1/8-inch diameter hole for each pop rivet. Seal each rivet and the inside of the end cap seam with caulk to make them watertight. You don’t need end caps where your gutter turns a corner.
Cut the Downspout Holes
With the gutter still on the ground, turn it upside down. Place one of your downspout outlets on top where you’d like to cut your downspout. This should be at the low end of the slope. Trace around the inside to mark the downspout hole, then drill a hole through the center of the outline.
Turn the gutter over and use your drill with a 4-inch hole saw bit to cut the downspout hole. Set the downspout outlet within the hole and seal around it with gutter sealant.
Mount the Gutters
Set each gutter section by the ladder in order of installation so your helper can hand it to you when you need it. Lay each run of gutter into the fascia brackets, following the slope line you snapped earlier. Rotate the gutter to slip its back edge into the hooks at the top of each bracket.
Once it’s in the brackets, drill holes into the gutter through each bracket’s screw mounting hole. Secure the gutter to the brackets with 1-inch stainless steel screws and your flanged nuts. If you have multiple sections of gutter in a run, seal them together with gutter sealant.
Attach Strip Miter Joints at Each Corner
If you have two lengths of gutter that meet at a corner, cover the joint between each with an aluminum strip miter. Wrap this strip tightly around the underside of the gutter and secure it with eight pop rivets. Fold the ends of the miter down around the top edge of the gutter. You can make these joints more waterproof by sealing them with caulk.
Attach the Downspouts
Screw your U-shaped downspout elbow brackets into place on the corner board of your house at the top, center, and bottom. Cut a piece of downspout to fit and screw it into place, adding a drainpipe extension at the bottom so water is carried away from the foundation. Fasten each part together with pop rivets.
What Can Happen if You Don’t Have Gutters
Gutters are an essential part of a functioning home. While there are gutter alternatives to consider, such as rain chains and French drains, most homes need some sort of gutter system to prevent serious damage.
Gutters serve many purposes. First and foremost, they protect and preserve your roof and the structure of your home from severe water damage—which is not a cheap problem to fix. On average, water damage restoration costs more than $3,625. But gutters also prevent soil erosion and keep water from pooling in specific parts of your yard.
Without gutters, you can expect costly roof damage, damage to the foundation of your home, and ongoing degradation of your yard.
Installing gutters can avoid these issues, but you’ve got to keep up with routine maintenance to keep them operating efficiently. Clear the insides regularly—and even clean the exterior to boost curb appeal and prevent damage over time. Here’s how to clean the outside of your gutters on your own.
DIY Gutter Installation vs. Hiring a Pro
If you’re simply weighing the cost to replace gutters yourself against hiring a gutter installation pro near you, the DIY route is going to save you about $75 per hour on labor. However, gutter replacement can be challenging. It involves a lot of tools and materials, and working on a ladder can be dangerous. A few mistakes can lead to problems and additional costs down the line.
DIY gutter replacement for first-story gutters can be a rewarding project for homeowners with DIY skills and experience. However, gutter replacement on a second story or higher should generally be left up to the pros.
Frequently Asked Questions
The gutters themselves cost between $3 and $30 per linear foot, depending on the material. Aluminum and vinyl are the least expensive, running between $3 and $7 per linear foot. Stainless steel gutters are in the middle-ground, costing between $9 and $20 per linear foot, and copper is the most expensive at $15 to $30 per linear foot.
Rain gutters should be level from front to back to prevent spillage as water runs from one side to the other. Horizontally, rain gutters should not be level. A slope of at least a 1/4-inch per 10 feet is recommended from the high end of a gutter to the downspout.
Place screws for gutter fascia brackets on every other rafter tail or a distance of no more than three feet apart. Rafter tails are typically spaced 16 inches apart from the center, allowing you to place brackets 32 inches apart.
Yes. Excessive pitch in gutters can cause water to flow too rapidly, leading to a decrease in the gutter's water-holding capacity; consequently, during heavy rainstorms, water may awkwardly splash outside the gutters. Ideally, you should aim for a quarter-inch of gutter slope for every 10 feet of gutter run. However, it's important to note that this guideline may vary depending on your home's structure and the type of gutters being installed.


